Example Case: Using DevSecOps to Redefine Minimum Viable Product

In 2023, I had the pleasure of working with a group of talented interns who joined the Software Engineering Institute (SEI) for the summer to gain insight into the research we conduct and experience in applying the concepts we study and develop. This SEI blog post, authored by the interns themselves, describes their work on an example case in which they designed and implemented a microservices-based software application along with an accompanying DevSecOps pipeline. In the process, they expanded the concept of minimum viable product to minimum viable process. I’d like to thank the following interns for their hard work and contributions:
- Evan Chen, University of California, San Diego
- Zoe Angell, Carnegie Mellon University
- Emily Wolfe and Sam Shadle, Franciscan University of Steubenville
- Meryem Marasli and Berfin Bircan, University of Pittsburgh
- Genavive Chick, University of Georgia
Demonstrating DevSecOps Practices in a Real-World Development Environment
DevSecOps is a set of principles and practices that fosters a collaborative environment in which developers, security professionals, IT operations, and other stakeholders collaborate to produce reliable and secure software. The DevSecOps pipeline can be thought of as the machinery that allows stakeholders to collaborate and enforce standards or policies in an automated fashion. Both an application and a continuous integration/continuous deployment (CI/CD) pipeline must be configured to specifically support a software development lifecycle (SDLC), because a particular software architecture might require a unique set of CI/CD capabilities (Figure 1).
Our goal during our time at the SEI was to implement DevSecOps via a web-based application using a CI/CD pipeline. This pipeline automates procedures to enable better communication, environment parity, testing, and security to satisfy stakeholder needs. In conducting this work, we learned just how hard it is to implement proper DevSecOps practices: We found it was easy to get sidetracked and lose sight of the capabilities required for the project. We learned many lessons taking on these challenges.

Development Approach: Minimum Viable Process
The term minimum viable product (MVP) defines the minimum features needed for a product to work at its most basic form. The approach of articulating an MVP is powerful because it removes unnecessary complexity from a product when trying to define and develop its basic architecture. Utilizing a DevSecOps approach to our software development lifecycle resulted in shifting focus from producing an MVP to instead creating a minimum viable process.
A minimum viable process includes defining and implementing the stages necessary to create a functioning CI/CD pipeline. By implementing a minimum viable process before jumping into development, we spurred the engagement of all stakeholders early. Doing so meant that development, security, and operations groups could work together to establish the architecture of the application, including needed libraries, packages, security measures, and where the application will be served.
By applying a minimum viable process, major problems with the application (e.g., a vulnerable library) could be addressed at the beginning of the development cycle rather than after months of development. Discovering and correcting problems early is known to save both time and money, but another side effect of a minimum viable process is the identification of training and personnel needs along with data and metrics for continuous improvement. Our team followed these guidelines by developing a functioning pipeline before adding features to the microservice architecture.
Example Case: Internal Reporting
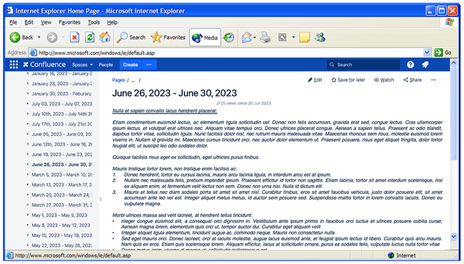
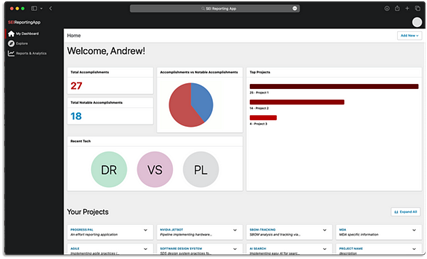
Since a DevSecOps pipeline is not nearly as interesting without an application to try it on, we chose a project both interesting and useful for the team. Our SEI organization was hoping to streamline its current approach to generating weekly, monthly, and yearly reports from manually edited,(wiki-based text documents (Figure 2) to a purpose-built web app (Figure 3). Our goal was to design, develop, and deliver a microservice-based web application and the CI/CD tooling, automation, and other capabilities necessary to produce a quality product.
We developed the optimized reporting application shown in Figure 3 by using a PostgreSQL back end with Tortoise ORM and Pydantic serialization, a VueJS front end, and FastAPI to support the application connection from old to new. Most importantly, we did not start any development on the web app until the pipeline was finished using DevSecOps best practices.
Our Pipeline: Five Stages
Our pipeline consisted of five stages:
- Static Analysis
- Docker Build
- SBOM Analysis
- Secure Signing
- Docker Push
The following sections describe these five stages.

Stage 1: Static Analysis with SonarQube
Static Analysis involves examining the code in-place, without executing it, for linting, formatting, and discovery of bugs. Originally, we set up separate linting tools specific to the languages we were using: Python and VueJS. These five tools we used were
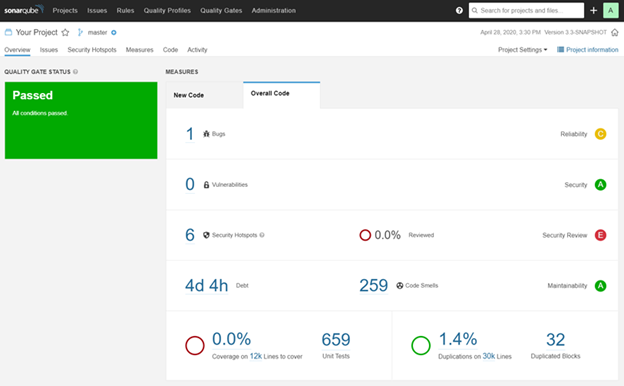
These tools had some overlapping capabilities, conflicting results, limited debugging functionality, and required separate configuration. To optimize this configuration process, we switched from using five individual tools to using just one, SonarQube. SonarQube is an all-in-one tool that offered vulnerability and bug checks against an up-to-date database, linting, and formatting viewable in a convenient dashboard (Figure 5). This solution was easier to implement, offered enhanced functionality, and simplified integration with our CI/CD pipeline.
Stage 2: Docker Build
In the pipeline, we built two Docker images: one for the front end, which included VueJS, and one for the back end, which had the imports needed to use FastAPI. To build the images, we used Podman-in-Podman instead of Docker-in-Docker. This choice provided us with the same capabilities as Docker-in-Docker, but provided enhanced security through its default daemon-less architecture.
We simplified our Docker-build stage (Figure 6) into three main steps:
- The pipeline built the Docker image with the Podman build command.
- We used Podman inspect to acquire the secure hashing algorithm (SHA) digest for the Docker image.
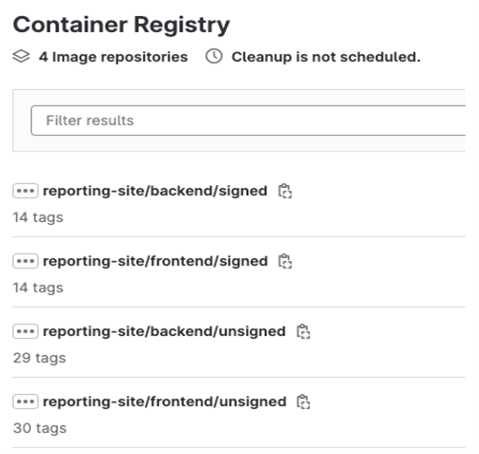
- We pinned the Docker image with its SHA digest and pushed it to our GitLab container registry, intentionally putting the image in a folder called “unsigned.”
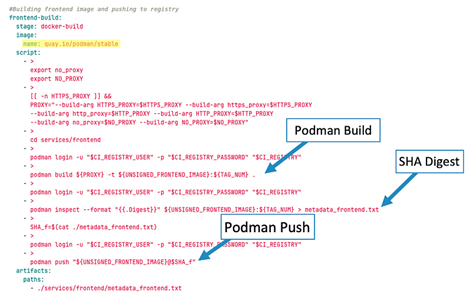
Ideally, we would not have pushed an unsigned Docker image to the GitLab container registry. However, the sizes of the images were too large to be stored as artifacts on our runner. Our solution was therefore to push the unsigned docker images while simultaneously separating our container registry between signed and unsigned images.
Stage 3: SBOM Analysis
Our next stage is the software bill of materials (SBOM) analysis stage. An SBOM is akin to an ingredient list of all the different components contained in the software. SBOMs provide a crucial component for accurate vulnerability detection, monitoring and securing supply chains.
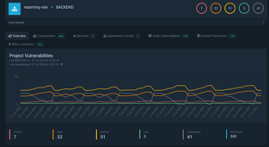
We completed the SBOM analysis stage with three different jobs. The first job was to generate the SBOMs using Grype, a vulnerability scanner tool that can also generate SBOMs. This tool scanned the previously built containers and then generated an SBOM for the frontend and backend of the application. Next, the SBOMs were pushed to an SBOM analysis platform called Dependency Track (Figure 7). The Dependency Track analyzes the SBOMs and determines which components are vulnerable. Lastly, the data from Dependency Track is pulled back into the pipeline to easily view how many policy violations and vulnerabilities are in the frontend and backend of the application.
Stage 4: Secure Signing
When creating a pipeline that generates artifacts, it is important to have a secure signing stage to ensure that the generated artifacts have not been tampered with. The generated artifacts for this pipeline are the containers and SBOMs. To sign these artifacts, we used Cosign, which is a tool for signing, verifying, and managing container images and other artifacts.
Cosign does not directly sign SBOMs. Rather, it uses an In-toto attestation that generates verifiable claims about how the SBOM was produced and packaged into a container. To sign containers, Cosign has built-in sign and verify methods that are very easy to use in a pipeline (Figure 8).
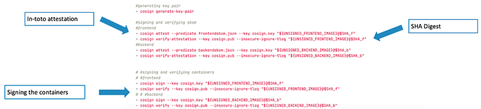
In this stage, the containers were referred to with an SHA digest instead of a tag. When a digest is used, Docker refers to an exact image. This detail is important because after the secure signing stage is completed, developers will know exactly which image is securely signed since it was signed with the digest. Cosign will eventually stop supporting signing with a tag and at that point an alternative method to our current approach would be necessary.
Stage 5: Docker Push
In the final stage of the pipeline, the signed Docker images are pushed to the GitLab container registry (Figure 9). Similar to Docker build, this stage is separated into two jobs: One is pushing the signed front-end image and the other is pushing the signed back-end image. The three main steps of this stage are pulling the image from the cloud registry, changing the image destination from an unsigned to a signed folder, and, finally, pushing the image (Figure 10).
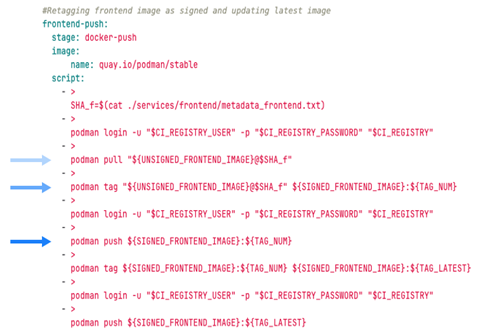
The Docker Push stage pushes the same image twice: one with the build pipeline number as the tag and the other with “latest” as the tag. This approach provides a record of previous signed Docker images in the pipeline while ensuring that the image tagged “latest” is the most recent Docker image.
Technical Takeaways for Using DevSecOps Pipelines
This example case, in which we worked to turn policies, best practices, and other reference design material into practice in a real-world development environment, illustrated the importance of the following:
- Conduct extensive research before diving into pipeline development. Using one tool (SonarQube) was far better, both for functionality and ease of use, than the five-plus linting tools we applied in our initial effort. DevSecOps is not just an array of tools: These tools, selected carefully and used intelligently, must work together to bring the disparate processes of development, security, and operations into one cohesive pipeline.
- Know your development environment and runner well. We spent significant time working to implement Docker-in-Docker in the pipeline only to learn it was not supported by our runner. Consistent with DevSecOps best practices, a team works best when each member has a working knowledge of the full stack, including the runner’s configuration.
- Actively maintain and monitor the pipeline, even during development and deployment. Once the pipeline was complete, we moved to development only to discover several weeks later that SonarQube was showing many linting errors and a failing pipeline. Resolving these issues periodically, rather than allowing them to build up over weeks, facilitates the continuous delivery integral to DevSecOps.
- Establish a Minimum Viable Process. A successful DevSecOps implementation requires collaboration and really shines when stakeholders are engaged early in the SDLC. By establishing a minimum viable process, you truly embrace DevSecOps culture by providing an environment that allows for continuous learning, continuous improvement, and early identification of metrics.
Next Steps for Improving the DSO Pipeline
In forward work we plan to add In-toto, DefectDojo, and app deployment to our pipeline to improve project security, as described below:
- In-toto will sign each step of the pipeline, creating a documented log of who did what and in what order, thus, creating a secure pipeline.
- DefectDojo will help with app security. It will allow for easy management of multiple security tools checking for vulnerabilities, duplications, and other bad practices. In addition, it will track vital product information, such as language composition, technologies, user records, and more. This capability will create an overview for the entire project.
- Adding deployment as part of the pipeline ensures that any changes to our project will be thoroughly tested before implementation in our site; consequently, lowering the chances crashing.
Additional Resources
View the SEI Podcast A Platform-Independent Model for DevSecOps.
View the SEI Podcast Model-Based Systems Engineering Meets DevSecOps.
Written By

More By The Author
PUBLISHED IN
Get updates on our latest work.
Sign up to have the latest post sent to your inbox weekly.
Subscribe Get our RSS feedGet updates on our latest work.
Each week, our researchers write about the latest in software engineering, cybersecurity and artificial intelligence. Sign up to get the latest post sent to your inbox the day it's published.
Subscribe Get our RSS feed