Creating a Large Language Model Application Using Gradio

Recently, my work required me to rapidly prototype a web application that allows users to query large language models (LLMs) across three primary use cases: basic question-and-answer, question-and-answer over documents, and document summarization. This work, dubbed the "Mayflower Project," culminated in several significant lessons learned that we have published in our paper A Retrospective in Engineering Large Language Models for National Security. In this post, I share my experience building the different features of Mayflower’s web application and provide step-by-step code so that we can achieve similar results.
Lowering the Barrier to Entry for Implementing LLMs
Our work at the SEI often involves investigating cutting-edge technologies, researching their practicalities, and testing their performance. LLMs have become a mainstay in the artificial intelligence (AI) and machine learning (ML) communities. LLMs will continue to have an impact in larger societal areas, such as academia, industry and defense. Since they appear to be here for the foreseeable future, we in the SEI AI Division are researching their uses and limitations.
One area of research in support of this mission is investigating how both users and developers can interface with LLMs and how LLMs can be applied to different use cases. Without a front end or user interface, LLMs are unable to provide value to users. Part of my work on the AI Division’s Mayflower Project was to build a web application to serve as this interface. This interface has allowed us to test multiple LLMs across three primary use cases—basic question and answer, question and answer over documents, and document summarization.
The barrier to entry for creating LLM-based applications appears to be high for developers who do not have much experience with LLM technologies or with ML. By leveraging our work via the steps I outline in this post, any intermediate Python developer can lower that barrier to entry and create applications that leverage LLM technologies. Please note that the application we build in this post is just for personal testing and should not be deployed to production as is.
The LLM Application Stack: Gradio and Hugging Face Transformers
The LLM application stack depends on two primary tools: Gradio and the Hugging Face Transformers library.
The Gradio Python library serves as the backbone for the entire application stack we will build in this post. A number of features make this library well suited for rapidly prototyping small web applications. Gradio enables us to define interactive front ends with hooks into Python back-end functions with ease. All the coding is done in Python, so we don’t need to be experienced with traditional front-end web development practices to use it effectively. The interfaces we can make are even relatively attractive, although we can pass in our own CSS and JavaScript files to override default styles and behaviors.
Using Gradio as our front and back end enables us to easily integrate Python-based machine learning using the Hugging Face Transformers library. This Transformers library provides APIs and tools to easily download and train state-of-the-art pretrained models. With just a few lines of code, we can download, load, and query any pre-trained LLM that our local resources can support. Gradio complements Transformers by allowing us to quickly build a web application that enables users to send queries to our LLM and subsequently receive a response.
The combination of Gradio and Hugging Face Transformers forms a quick and flexible application stack that enables the development of advanced LLM applications. Gradio offers a seamless and intuitive interface, eliminating the need for extensive front-end development knowledge while ensuring smooth integration with Python-based machine learning through Hugging Face Transformers.
Preparing a Development Environment for our LLM Application
To build and run this LLM server and its dependencies, we must install Python 3.8 or higher. In the screenshots and code in this post, we will be using Python version 3.10. We will also execute this code in a Linux environment, but it should also work in the Windows environment. Likewise, we need to install the corresponding version of pip, which enables us to quickly install the Python libraries used here.
There are many ways to execute Python code in an isolated environment. One of the most popular ways to do this is through the use of virtual environments. In this post, we’ll be using the Python venv module, since it is quick, common, and easy to use. This module supports creating lightweight virtual environments, so we can use it to neatly contain this code on its own.
To start, open up a privileged terminal. If we don’t already have venv installed, we can install it easily with pip:
pip3 install -y virtualenvWith venv installed, we can now establish a virtual environment for this project. We’re going to name this environment “gradio_server”.
python3 -m venv gradio_serverIf we peruse the directory we’re working in, we’ll notice that there is a new directory that has been given the name we specified in the previous command. The last thing we do before we start building this project out is activate the virtual environment. To do so, we just need to run the environment activation script:
source gradio_server/bin/activate
(venv) $
Running the activation script will likely cause our terminal prompt to change in some visual way, such as the second line shown above. If this is the case, we’ve activated our virtual environment, and we are ready to move on to the next steps. Keep in mind that if we exit this terminal session, we will need to reactivate the virtual environment using the same command.
Installing Gradio and Getting a Front End Running
With our virtual environment established, we can begin installing the Gradio Python library and setting up a basic web application. Using pip, installing Gradio consists of one command:
pip3 install gradioAs easy as installing Gradio was, using it to quickly set up a web server is similarly easy. Putting the code below into a Python file and running it will produce a very basic web server, with a single place to accept user input. If we run this code, we should be able to visit "localhost:7860" in our browser to see the results.
import gradio as gr

with gr.Blocks() as server:
  gr.Textbox(label="Input", value="Default value...")

server.launch()
Result:
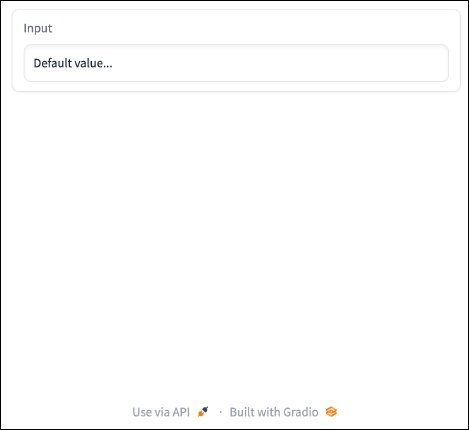
Excellent. We have a very simple web server up and running, but users cannot interact with the one input we’ve placed there yet. Let’s fix that, and spruce up the application a bit too.
import gradio as gr

with gr.Blocks() as server:
  with gr.Tab("LLM Inferencing"):
    model_input = gr.Textbox(label="Your Question:", value="What’s your question?", interactive=True)
    model_output = gr.Textbox(label="The Answer:", interactive=False, value="Answer goes here...")

server.launch()
Result:
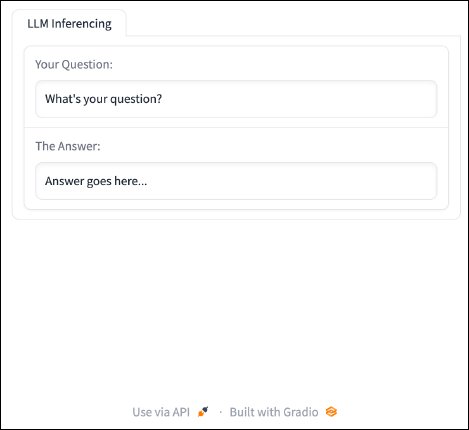
The new additions include a labeled tab to assist with organization, a place for our application to display output, and labels to our inputs. We have also made the user input interactive. Now, we can make these inputs and outputs useful. The input textbox is ready to accept user input, and the output textbox is ready to show some results. Next, we add a button to submit input and a function that will do something with that input using the code below:
import gradio as gr

def ask(text):
  return text.upper()

with gr.Blocks() as server:
  with gr.Tab("LLM Inferencing"):
    model_input = gr.Textbox(label="Your Question:",
                             value="What’s your question?", interactive=True)
    ask_button = gr.Button("Ask")
    model_output = gr.Textbox(label="The Answer:",
                              interactive=False, value="Answer goes here...")

  ask_button.click(ask, inputs=[model_input], outputs=[model_output])

server.launch()
Result:
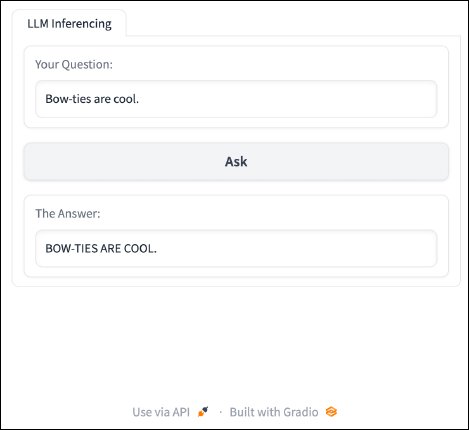
The above code defined a function that manipulates the text that is inputted by the user to convert all characters to uppercase. In addition, the code added a button to the application which allows users to activate the function.
By themselves, the button and the function do nothing. The essential piece that ties them together is the event-listener toward the end of the code. Let’s break this line down and examine what’s happening here. This line takes the ask_button, which was defined earlier in the code, and adds an event-listener via the .click method. We then pass in three parameters. The first parameter is the function that we want to execute as the result of this button being clicked. In this case, we specified the ask function that we defined earlier. The second parameter identifies what should be used as input to the function. In this case, we want the text that the user inputs. To grab this, we need to specify the model_input object that we defined earlier in the code. With the first two parameters, clicking the button will result in the ask method being executed with the model_input text as input. The third parameter specifies where we want return values from the ask function to go. In this case, we want the output to be returned to the user visibly, so we can simply specify the output textbox to receive the modified text.
And there we have it. With just a few lines of Python code, we have a web application that can take user input, modify it, and then display the output to the user. With this interface set up and these fundamentals mastered, we can incorporate LLMs into the mix.
Adding ChatGPT
Okay, let’s make this web application do something interesting. The first feature we’re going to add is the ability to query a LLM. In this case, the LLM we’re going to integrate is ChatGPT (gpt-3.5-turbo). Thanks to the Python library that OpenAI has published, doing this is relatively simple.
The first step, as usual, is to install the OpenAI Python library:
pip3 install openaiWith the dependency installed, we’ll need to add it to the imports in our application code:
import gradio as gr
import openai
Note that ChatGPT is an external service, which means we won’t be able to download the model and store it locally. Instead, we will have to access it via OpenAI’s API. To do this, we need both an OpenAI account and an API key. The good news is that we can make an OpenAI account easily, and OpenAI allows us a certain number of free queries. After we’ve signed up, follow OpenAI’s instructions to generate an API Key. After generating an API key, we will need to give our Python code access to it. We generally should do this using environment variables. However, we can store our API Key directly in the code as a variable, since this application is just for testing and will never be deployed to production. We can define this variable directly below our library imports.
# Paste your API Key between the quotation marks.
openai.api_key = ""
With the library installed and imported and API key specified, we can finally query ChatGPT in our program. We don’t need to change too much of our application code to facilitate this interaction. In fact, all we have to do is change the logic and return value of the ask method we defined earlier. The following snippet of code will change our "ask" function to query ChatGPT.
def ask(text):

  completion = openai.ChatCompletion.create(
    model="gpt-3.5-turbo",
    messages=[
      {‘role’: ‘user’, ‘content’: text}
    ],
    temperature=0
  )
  return completion.choices[0].message.content
Let’s break down what’s happening in the method. Only two real actions are occurring. The first is calling the openai.ChatCompletion.create(), which creates a completion for the provided prompt and parameters. In other words, this function accepts the user’s input question and returns ChatGPT’s response (i.e. its completion). In addition to sending the user’s question, we’re also specifying the model we want to query, which is gpt-3.5-turbo in this case. There are several models we can choose from, but we’re going to use OpenAI’s GPT-3.5 model. The other interesting thing we’re specifying is the model’s temperature, which influences the randomness of the model’s output. A higher temperature will result in more diverse, creative, outputs. Here we arbitrarily set the temperature to zero.
That’s it. Below we can see the code as a whole:
import gradio as gr
import openai
import os

# Paste your API Key between the quotation marks.
openai.api_key = ""

def ask(text):

  completion = openai.ChatCompletion.create(
    model="gpt-3.5-turbo",
    messages=[
      {‘role’: ‘user’, ‘content’: text}
    ],
    temperature=0
  )
  return completion.choices[0].message.content

with gr.Blocks() as server:
  with gr.Tab("LLM Inferencing"):

    model_input = gr.Textbox(label="Your Question:",
                             value="What’s your question?", interactive=True)
    ask_button = gr.Button("Ask")
    model_output = gr.Textbox(label="The Answer:", interactive=False,
                              value="Answer goes here...")

  ask_button.click(ask, inputs=[model_input], outputs=[model_output])

server.launch()
By running the above code, we should have a web application that is able to directly query ChatGPT.
Swapping ChatGPT for RedPajama
The current web server is basically just ChatGPT with extra steps. This function calls ChatGPT’s API and asks it to complete a query. Leveraging other organizations’ pretrained models can be useful in certain situations, but if we want to customize aspects of model interaction or use a custom fine-tuned model, we need to go beyond API queries. That’s where the Transformers library and the RedPajama models come into play.
Models like gpt-3.5-turbo have anywhere from 100 billion to more than a trillion parameters. Models of that size require enterprise-level infrastructure and are very expensive to implement. The good news is that there have been waves of much smaller LLMs from a variety of organizations that have been published in the last few years. Most consumer-grade hardware can support models with 3 billion or even 7 billion parameters, and models in this range can still perform quite well at many tasks, such as question-and-answer chatbots. For this reason, we’ll be using the RedPajama INCITE Chat 3B v1 LLM. This model performs moderately well while still being small enough to run on modern GPUs and CPUs.
Let’s dive back into our code and get RedPajama-INCITE-Chat-3B-v1 running in our web application. We’ll use the Hugging Face Transformers library, which makes this process surprisingly easy. Just as before, we will replace the code in our ask function to leverage the RedPajama-INCITE-Chat-3B-v1 model instead of ChatGPT. Before we can do that, we will need to install two Python libraries: PyTorch and Hugging Face Transformers.
pip3 install -y torch transformersWith those installed, we can implement the new logic in our "ask" function:
import torch
from transformers import AutoTokenizer, AutoModelForCausalLM

def ask(text):
  tokenizer = AutoTokenizer.from_pretrained("togethercomputer/RedPajama-INCITE-Chat-3B-v1")
  model = AutoModelForCausalLM.from_pretrained("togethercomputer/RedPajama-INCITE-Chat-3B-v1", torch_dtype=torch.bfloat16)

  inputs = tokenizer(text, return_tensors=‘pt’).to(model.device)

  input_length = inputs.input_ids.shape[1]
  outputs = model.generate(**inputs, max_new_tokens=100, temperature=0.7,
                           return_dict_in_generate=True)

  tokens = outputs.sequences[0, input_length:]
  return tokenizer.decode(tokens)
The first thing to note about the new code is that we’ve imported PyTorch as well as AutoTokenizer and AutoModelForCausalLLM from Transformers. The latter two functions are how we will load the RedPajama model and its associated tokenizer, which occur on the first and second lines of the new ask function. By leveraging the Transformers library, both the tokenizer and the model will be directly downloaded from Hugging Face and loaded into Python. These two lines of code are all that we need to grab the RedPajama-INCITE-Chat-3B-v1 and start interacting with it. The following line focuses on parsing the user’s inputted text into a format can be fed into the model.
The next two lines are where the magic happens. Specifically, model.generate() is how we feed the prompt into the model. In this example, we’re setting max_new_tokens to be 100, which limits the length of text the model can produce as output. While increasing this size does allow the model to produce longer outputs, each token produced increases the time needed to get a result. We’re also specifying the temperature of this model’s response to be 0.7. As mentioned earlier, a higher temperature results in more random and creative outputs by giving the model more leeway when selecting which token to choose next. Set the temperature low (closer to 0.0) if we want consistency in our model responses. Finally, the last two lines are there to extract the new tokens (i.e., the LLM’s response to the user input) and then return it to the user interface.
There are two additional notes about this new code. First, as it currently stands, this implementation will run only using CPUs. If you have an Apple M1 or later processor with GPU cores and unified memory, you can follow instructions here to ensure you are utilizing that hardware. If you have a GPU and are familiar with using CUDA with PyTorch, you can utilize your GPU by adding the following line of code to our ask function:
def ask(text):
	...
	model = AutoModelForCausalLM.from_pretrained("togethercomputer/RedPajama-INCITE-Chat-3B-v1", torch_dtype=torch.bfloat16)
	# ADD THIS
	model = model.to(‘cuda:0’)
Second, when we turn the server on and submit we first query, the model and tokenize will be automatically downloaded. Depending on our Internet connection, it may take some time to complete. It will look something like this:
Downloading (…)okenizer_config.json: 100%|████████████████████████████████████████████| 237/237 [00:00<00:00, 132kB/s]
Downloading (…)/main/tokenizer.json: 100%|███████████████████████████████████████| 2.11M/2.11M [00:00<00:00, 2.44MB/s]
Downloading (…)cial_tokens_map.json: 100%|██████████████████████████████████████████| 99.0/99.0 [00:00<00:00, 542kB/s]
Downloading (…)lve/main/config.json: 100%|███████████████████████████████████████████| 630/630 [00:00<00:00, 3.34MB/s]
Downloading pytorch_model.bin: 100%|█████████████████████████████████████████████| 5.69G/5.69G [22:51<00:00, 4.15MB/s]
Downloading (…)neration_config.json: 100%|████████████████████████████████████████████| 111/111 [00:00<00:00, 587kB/s]
When the download is complete, the code will next give the input prompt to the newly downloaded model, which will process the prompt and return a response. After downloading once, the model will be able to respond to queries in the future without needing to be re-downloaded.
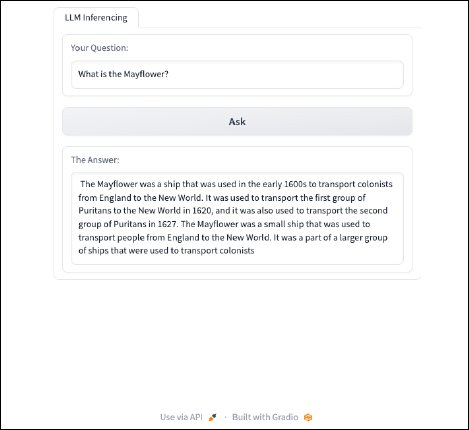
Last, after implementing the new code and turning the server back on, we can ask the RedPajama-INCITE-Chat-3B-v1 model questions. It will look like this:
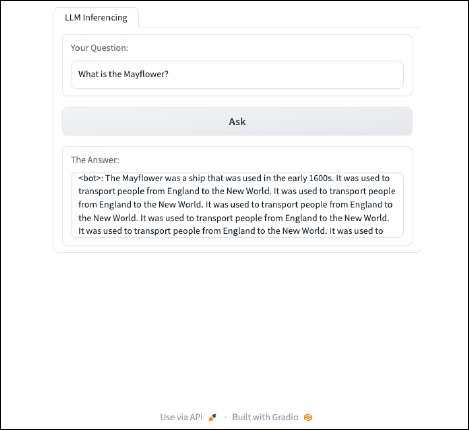
Implementing Prompt Engineering
We got output. That’s great. However, the output could be improved by implementing prompt engineering to improve the responses from the RedPajama-INCITE-Chat-3B-v1 model. At their core, LLMs are next-word predictors. They receive an input, a prompt, and then predict what word (token) will come next based on the data they were trained on. The model repeats the process of predicting next words until it reaches a stopping point. Without any fine-tuning, smaller parameter models such as this one are generally only good at finishing sentences.
The RedPajama-INCITE-Chat-3B-v1 model is actually a fine-tuned version of the RedPajama-INCITE-Base-3B-v1. The original model was trained on a dataset of knowledge and grammar to grow its ability to produce quality text responses. That model then received additional training that specifically improves its ability to perform a chosen task. Because this chat model was fine -tuned specifically as a question-and-answer chat bot, the best results from this model will come from prompts that mirror the dataset used for fine-tuning. RedPajama provides an example of how prompts should be engineered for this purpose:
prompt = "<human>: Who is Alan Turing?\n<bot>:"What we can learn from the provided example is that instead of passing the model our query directly, we should format it like the above prompt format. Implementing that in the ask function can be done with just one line of code.
def ask(text):
	...
	# ADD THIS
	prompt = f’<human>: {text}\n<bot>:’
	inputs = tokenizer(prompt, return_tensors=‘pt’).to(model.device)
	...
That line takes the user input and inserts it into a prompt that works well with this model. The last thing to do is test to see how the prompt has affected the model’s responses. Running the same query as before, our input should look like this:
While not perfect, prompt engineering helped to provide a more useful response from the model. Below is the final, full program code.
import gradio as gr
import openai
import os

import torch
from transformers import AutoTokenizer, AutoModelForCausalLM

def ask(text):

  tokenizer = AutoTokenizer.from_pretrained("togethercomputer/RedPajama-INCITE-Chat-3B-v1")
  model = AutoModelForCausalLM.from_pretrained
    ("togethercomputer/RedPajama-INCITE-Chat-3B-v1",
     torch_dtype=torch.bfloat16)

  prompt = f’<human>: {text}\n<bot>:’
  inputs = tokenizer(prompt, return_tensors=‘pt’).to(model.device)

  input_length = inputs.input_ids.shape[1]
  outputs = model.generate(**inputs, max_new_tokens=48, temperature=0.7,
                           return_dict_in_generate=True)

  tokens = outputs.sequences[0, input_length:]
  return tokenizer.decode(tokens)

with gr.Blocks() as server:
  with gr.Tab("LLM Inferencing"):

    model_input = gr.Textbox(label="Your Question:",
                             value="What’s your question?", interactive=True)
    ask_button = gr.Button("Ask")
    model_output = gr.Textbox(label="The Answer:", interactive=False,
                              value="Answer goes here...")

  ask_button.click(ask, inputs=[model_input], outputs=[model_output])

server.launch()
Next Steps: Advanced Features
With the help of Gradio and the Hugging Face Transformers library, we were able to quickly piece together the prototype shown in this blog post. Now that we have experience working with Gradio and Transformers, we can expand this web application to perform all sorts of tasks, such as providing an interactive chatbot or performing document summarization. In future blog posts, I will navigate the process of implementing some of these more advanced features.
Additional Resources
- A Retrospective in Engineering Large Language Models for National Security - https://insights.sei.cmu.edu/library/a-retrospective-in-engineering-large-language-models-for-national-security/
- Case Studies Used to Show Utility & Limitations of ChatGPT - https://seinet.sei.cmu.edu/news-and-events/news/item?id=6170
- Harnessing the Power of Large Language Models For Economic and Social Good - https://seinet.sei.cmu.edu/news-and-events/news/item?id=6176
- Realistic Human Activity Using LLM's - https://seinet.sei.cmu.edu/news-and-events/news/item?id=6190
Written By

More By The Author
More In Artificial Intelligence Engineering
PUBLISHED IN
Get updates on our latest work.
Sign up to have the latest post sent to your inbox weekly.
Subscribe Get our RSS feedMore In Artificial Intelligence Engineering
Get updates on our latest work.
Each week, our researchers write about the latest in software engineering, cybersecurity and artificial intelligence. Sign up to get the latest post sent to your inbox the day it's published.
Subscribe Get our RSS feed