How to Build a Trustworthy Free/Libre Linux Capable 64-bit RISC-V Computer

The attack surface for commercial hardware now spans all stages of the development lifecycle. Even in the presence of secure, bug-free software, the growing threat of hardware Trojans and backdoors enables adversaries to compromise a system in its entirety or execute a privilege escalation attack. This reality became painfully evident in the wake of Spectre/Meltdown attacks. These two vulnerabilities, which came to light in 2018, affected a wide swath of microprocessors that allowed attackers to access sensitive system data.
With the rapid growth of the computing and IT technology market, the government is now deploying commercially produced, civilian market hardware in security-sensitive environments. Opportunities for hardware attacks are compounded by market forces, including the increasing length of microchip design, development, and fabrication supply chains; outsourcing; the multinational nature of major chipmakers; and the global and highly mobile nature of the workforce that chipmakers employ.
As I detailed on my website, in this blog post I propose how to build a computer with an open source electronic device automation (EDA) toolchain that prevents the insertion of privilege escalation exploits and facilitates detection of hardware denial of service vulnerabilities. Though at the SEI we are still refining this approach, it will ultimately make it easier for government agencies, and private individuals concerned with keeping their computing devices safe, to build systems with increased security assurance levels.
1. The Tools to Build the Computer
My goal is to build a free and open source computer from the ground up, so I may completely trust that the entire hardware system's behavior is 100 percent attributable to its fully available hardware description language (HDL) and software sources.
I need to be able to run the build tools on the system that I am building my open source computer for, and right now I am using an x86_64 (Intel CPU-based) Linux system. I need to be able to build it with the open-source computer itself, so as not to depend on Intel or any other chip maker, since I cannot inspect their internal behavior, or access and rebuild their sources.
More importantly, I need all the compilers and associated toolchains involved in building the overall system, from HDL and software sources, to be free and open source, and to be themselves buildable and runnable on the computer system being described. In other words, I need a self-hosting, free, and open source hardware and software stack.
I do not have a silicon foundry, so I cannot fabricate my own application-specific integrated circuit (ASICs). Instead, I will build the hardware component of this computer on a field-programmable gate array (FPGA), ensuring that any programming of, and bitstream generation for, the FPGA happens with free and open source tools. I consider the tradeoff to be worthwhile and advantageous for trustworthiness:
- The chip foundry would not know what the FPGA would be used for or where the proverbial privilege bit would be laid out on the chip. This lack of foreknowledge mitigates the ability to insert privilege-escalation hardware backdoors. Exposure is limited to the foundry planting DoS attacks into the silicon during FPGA fabrication, which yields a significantly improved level of assurance: a compromised computer may stop working altogether, but it cannot betray its owner to an adversary while pretending to operate correctly.
- The FPGA is a regular grid of identical components, so visual inspection, such as chemical ablation and transmission electron microscopy (TEM) imaging, though destructive, is more feasible than with a dedicated ASIC, which has much less visual regularity and repeatability.
Having constrained the fabrication-stage attack surface, I can cover the remaining hardware attack vectors--malicious sources and/or toolchain--by insisting on buildable sources to everything, resulting in a finished product (i.e., hardware and software) that is as trustworthy as its openly auditable HDL and software sources.
The following is a list of links to additional resources, documents, and early experiments related to building the system described above:
- Slide deck detailing my work on trustworthy computing at the CERT Division of the SEI.
- lowRISC project and my effort to rebase its components to their respective upstream projects. This project was a tremendously helpful resource and understanding its components was a great learning experience. At the time of this writing, however, the project relies on a closed-source HDL toolchain and utilizes proprietary IP modules (e.g., DRAM controller) as part of its component list.
- yoloRISC, an RV64IMAC, Rocket-Chip-based blinky demo system-on-chip (SoC), built using yosys/trellis/nextpnr for the Lattice ECP5 5G Versa development board.
2. Build Instructions for LiteX+Rocket 64-bit SoC
2.1. Prerequisites and Ingredients
Here we build a complete, Linux-capable 64-bit computer all the way from HDL and software sources. Here are the main ingredients:
- CPU Core: Rocket Chip
- SoC Environment: LiteX
- Python-based Meta-HDL: Migen
- Verilog Synthesis Front-end: Yosys
- FPGA Programming Details (Device Database): Trellis
- FPGA Place and Route tool: nextpnr
- Userspace Software Environment: BusyBox
- Kernel: Linux
- Bootloader: BBL
- C Cross-compiler: riscv-gnu-toolchain
I maintain forks of some of these projects at https://github.com/gsomlo, with patches in various stages of upstream readiness. I will use links to these forks in the instructions to follow, with the understanding that they will be rebased as upstreaming work progresses. The end goal is to delete the forks altogether once all changes they contain are merged upstream.
2.2. Setup
2.2.1. Development Environment
On a recent Fedora x86_64 workstation (e.g., F30), install the following packages:
dnf install \
        dtc fakeroot perl-bignum \
        json-c-devel libevent-devel libmpc-devel mpfr-devel \
        python3-migen yosys trellis nextpnr
I expect other Linux distributions (e.g., Debian/Ubuntu) to end up with similarly named packages in the near future. Until then, one may have to build them from source according to their respective build/install instructions. I recommend the following (or newer) git snapshots for each tool:
- Migen: 5c5486b
- Yosys: 8455d1f
- Trellis: 3311e6d
- nextpnr: ff95883
2.2.2. Building the C Cross-Compiler Toolchain
Pre-built binaries exist for this step and may be more convenient for quick, one-off experimentation. Also, RISC-V support should be fully upstreamed in GCC v.9. The build-from-source instructions below offer a fairly recent, self-contained bundle of both the compiler and runtime libraries as a source distribution, so I'm using it for now:
git clone --recursive https://github.com/riscv/riscv-gnu-toolchain
pushd riscv-gnu-toolchain
/configure --prefix=$HOME/RISCV --enable-multilib
make newlib linux
popd
These commands may take several hours to build, so it might make sense to start it inside a screen session, and have it email you when finished.
Be sure to add "$HOME/RISCV/bin" to your $PATH. For example, in bash:
export PATH=$PATH:$HOME/RISCV/bin2.2.3. Setting Up LiteX
To install the LiteX SoC environment, follow these steps:
mkdir ~/LITEX; cd ~/LITEX

    # main LiteX project (rebasing clone with work-in-progress patches):
    git clone --recursive https://github.com/gsomlo/litex
    (cd litex; git checkout gls-devel; python3 setup.py develop --user)

    # sub-components of LiteX (unmodified upstream):
    for i in dram eth pcie sdcard iclink video scope sata; do
      git clone --recursive https://github.com/enjoy-digital/lite$i
      (cd lite$i; python3 setup.py develop --user)
    done
LiteX already supports the 64-bit Rocket Chip for the most part, and includes a submodule with pre-generated Verilog files reflecting a few LiteX-specific, configuration-only changes to Rocket Chip sources.
2.3. Building FPGA Bitstream
This section shows how to build the "hardware" for our Linux-capable 64-bit Rocket+LiteX computer, in the form of FPGA bitstream.
2.3.1. Building for the ecp5versa Board
This board is programmed using completely free and open source tools (yosys/trellis/nextpnr). To build the bitstream, run:
cd ~/LITEX
    litex/litex/boards/targets/versa_ecp5.py \
      --gateware-toolchain trellis \
      --csr-csv ./csr_ecp5versa.csv \
      --with-ethernet --sys-clk-freq=60e6 \
--cpu-type rocket --cpu-variant linuxFIXME: At the time of this writing, this command fails when nextpnr attempts to place the netlist generated by yosys, which would occupy 102 percent of the available slices on the FPGA. With a currently experimental yosys patch (thanks to David Shah), and with the following patch applied to LiteX:
diff --git a/litex/build/lattice/trellis.py b/litex/build/lattice/trellis.py
index 87b4776b..ab4b1a8d 100644
--- a/litex/build/lattice/trellis.py
+++ b/litex/build/lattice/trellis.py
@@ -138,7 +138,7 @@ class LatticeTrellisToolchain:
         self.yosys_template = [
             "{read_files}",
             "attrmap -tocase keep -imap keep=\"true\" keep=1 -imap keep=\"false\" keep=0 -remove keep=0",
-            "synth_ecp5 -json {build_name}.json -top {build_name}",
+            "synth_ecp5 -nowidelut -abc9 -dsp -json {build_name}.json -top {build_name}",
         ]

         self.build_template = [
Finally, with lots of patience, one may be able to successfully build an ecp5versa bitstream that fits within the available slices and passes timing constraints at 60MHz. I did the following from a detached screen session:
while true; do
      litex/litex/boards/targets/versa_ecp5.py \
        --gateware-toolchain trellis \
        --csr-csv ./csr_ecp5versa.csv \
        --with-ethernet --sys-clk-freq=60e6 \
        --cpu-type rocket --cpu-variant linux
      if [ "$?" == "0"]; then
        echo success | mail -s "success" your@email.here
        break
      fi
    done
After about 10 hours and approximately 20 attempts, I obtained the following top.svf bitstream file. After connecting your ecp5versa with the serial console, run
openocd -f /usr/share/trellis/misc/openocd/ecp5-versa5g.cfg \
            -c "transport select jtag; init; svf top.svf; exit"
to configure the board. Connect an ethernet cable, and you can successfully download the software via trivial file transfer protocol (TFTP).
2.3.2. Building for the Nexys 4 DDR Board
This board requires the Vivado toolchain from Xilinx (I use version 2018.2), which is proprietary and needs licensing to run. Installation and licensing details for Vivado depend on your local circumstances.
To build the bitstream, run:
cd ~/LITEX
litex/litex/boards/targets/nexys4ddr.py \
  --gateware-toolchain-path ${HOME}/Xilinx/Vivado \
  --csr-csv ./csr_nexys4ddr.csv \
  --with-ethernet --sys-clk-freq=75e6 \
  --cpu-type rocket --cpu-variant linux
When this command completes, after an hour or two, find the file named
soc_ethernetsoc_nexys4ddr/gateware/top.bit, and use it to program your nexys4ddr board. I configured my board to load the bitstream from a microSD card, but there is an option to push the bitstream over the USB console cable or program it into the on-board SPI flash. This Nexys 4 DDR Programming Guide may help.
2.4. Preparing the Software Bundle
Once the FPGA board is programmed, the LiteX "bios" will run through its boot-up sequence and eventually attempt to download software, bundled together as a file named boot.bin, via TFTP. This section describes how to assemble that bundle.
2.4.1. Building BusyBox
BusyBox is built using busybox-1.31.0-rv64gc.config as its configuration file:
cd ~/LITEX
    curl https://busybox.net/downloads/busybox-1.31.0.tar.bz2 \
         | tar xfj -
    pushd busybox-1.31.0
    cp ~/busybox-1.31.0-rv64gc.config .config
    make CROSS_COMPILE=riscv64-unknown-linux-gnu-
    popd
2.4.2. Building an Embedded InitRamFS for Linux
Linux can boot from an internally embedded file system, provided to the kernel builder in the form of a cpio archive file. We use BusyBox to populate the binary folders of this file system and create a few additional device nodes:
cd ~/LITEX
    mkdir initramfs
    pushd initramfs
    mkdir -p bin sbin lib etc dev home proc sys tmp mnt nfs root \
             usr/bin usr/sbin usr/lib
    cp ../busybox-1.31.0/busybox bin/
    ln -s bin/busybox ./init
    cat > etc/inittab <<- "EOT"
::sysinit:/bin/busybox mount -t proc proc /proc
::sysinit:/bin/busybox mount -t tmpfs tmpfs /tmp
::sysinit:/bin/busybox --install -s
/dev/console::sysinit:-/bin/ash
EOT
    fakeroot <<- "EOT"
mknod dev/null c 1 3
mknod dev/tty c 5 0
mknod dev/zero c 1 5
mknod dev/console c 5 1
mknod dev/mmcblk0 b 179 0
mknod dev/mmcblk0p1 b 179 1
# mknod dev/mmcblk0p2 b 179 2
find . | cpio -H newc -o > ../initramfs.cpio
EOT
    popd
    rm -rf initramfs
NOTE: BusyBox is a quick, convenient way to demonstrate the system's functionality. Conceivably, a more elaborate initial root file system, such as one that pivots to mounting a complete Linux distro, such as Fedora or Debian, could be loaded instead, for a more feature-complete Linux experience.
2.4.3. Building the Linux Kernel
Now that we have the initial root file system containing user-space utilities, we may proceed to build the kernel:
cd ~/LITEX
    git clone https://github.com/gsomlo/linux.git
    pushd linux
    git checkout gls-litex-rocket
    cp ../initramfs.cpio .
    make ARCH=riscv CROSS_COMPILE=riscv64-unknown-linux-gnu- litex_defconfig
    make ARCH=riscv CROSS_COMPILE=riscv64-unknown-linux-gnu-
    popd
NOTE: I added a LiteX-specific default kernel configuration file and a driver for the LiteETH network interface, originally authored by Joel Stanley for the 32-bit linux-on-litex-vexriscv project. The kernel is otherwise unchanged from upstream, with no out-of-tree hacks whatsoever.
2.4.4. Building BBL
Somewhat improperly named, the Berkeley Boot Loader (BBL) is actually a machine (M) mode hypervisor of sorts, providing handlers for traps that the kernel, running in supervisor (S) mode, cannot handle itself. In our situation, the CPU core lacks a floating point unit (i.e., a floating point module that is optional to build in and takes up a substantial amount of room on the ASIC die or on the FPGA), but we still want the kernel (and userspace above it) to think floating-point operations are supported.
When an FP opcode comes up for execution, the resulting invalid "opcode" fault is punted all the way into M-mode, where BBL emulates the operation via its software trap handler. Similarly, the kernel's hvc/sbi console driver traps into M-mode, where BBL services character output to, and input from, the serial console.
Here is how to build BBL, with the Linux kernel from the previous step as its payload:
cd ~/LITEX
git clone https://github.com/gsomlo/riscv-pk
pushd riscv-pk
git checkout gls-litex
mkdir build
cd build
../configure --host=riscv64-unknown-linux-gnu \
--with-arch=rv64imac \
--with-payload=../linux/vmlinux \
--with-mem-start=0x40000000 \
--enable-logo
make bbl
riscv64-unknown-linux-gnu-objcopy -O binary bbl ~/LITEX/boot.bin
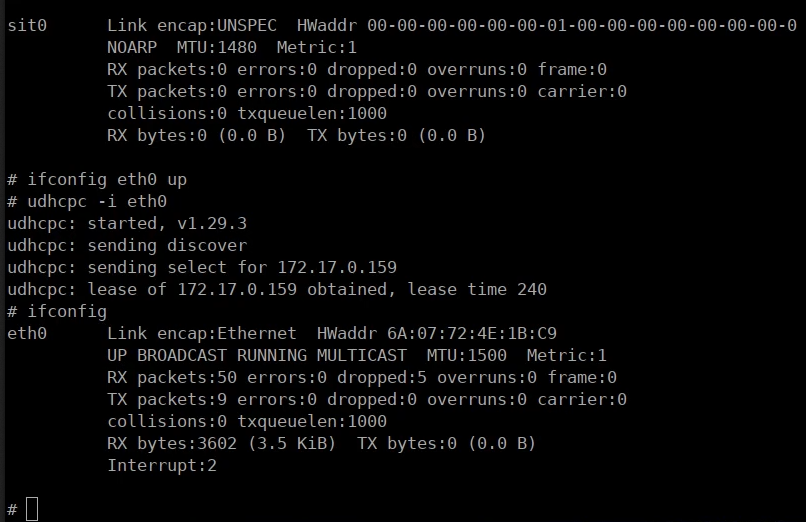
popdThe resulting boot.bin file must be made available from a TFTP server, so that the LiteX "bios" can download and execute it. 3. Demo The screen capture below is of a terminal booting 64-bit RV64IMAC Litex+Rocket Chip on a Nexys 4 DDR board. The system was built using the instructions above. The demo shows the user-space and kernel view of the supported CPU model and the OS version, and it demonstrates the ability of the network interface to send and receive packets:
4. Future Work
Under Construction
- Build yosys/trellis/nextpnr on some rv64gc Linux distro (e.g., Fedora or Debian).
- Run bitstream build from Section 2.3 of this poston an rv64gc distro, eventually on the LiteX+Rocket Free/Libre FPGA system itself.
- Perhaps on a Trellis Board, if it had 2GB of RAM or more.
Looking Ahead
While this post may seem to tout the benefits of open source and free software, my intent is to demonstrate that to establish ultimate trust in a system, a user--from government agencies to the individual home user--must have full access to the sources used to build that system.
Whether the sources are released publicly or under a free or open license is not so important. What matters is that for an entity, such as the DoD or Homeland Security, to trust a system, the entity must be capable of ensuring its trustworthiness by rebuilding it from scratch, in other words, field stripping it like any other weapon they would trust with their life.
Additional Resources
View a video that I recorded with my colleague Rotem Guttman on How to Build a Computer from Scratch.
Written By
Get updates on our latest work.
Sign up to have the latest post sent to your inbox weekly.
Subscribe Get our RSS feedGet updates on our latest work.
Each week, our researchers write about the latest in software engineering, cybersecurity and artificial intelligence. Sign up to get the latest post sent to your inbox the day it's published.
Subscribe Get our RSS feed